In this guide I'll show you how to quickly add a cookie consent banner to your website.
We will use CookieHub, the one of the most known and convenient consent management platform that is GDPR, LGPD, and CCPA compliant. In addition to the cookie consent tool, the service automatically creates a cookie policy for the website and updates it when necessary. They also have multiple banner interface languages, WordPress plugin, and responsive customer support.
Step #1. Choose a tariff plan and register
The key criteria for choosing a tariff plan are monthly user sessions count and the pages scan limit:
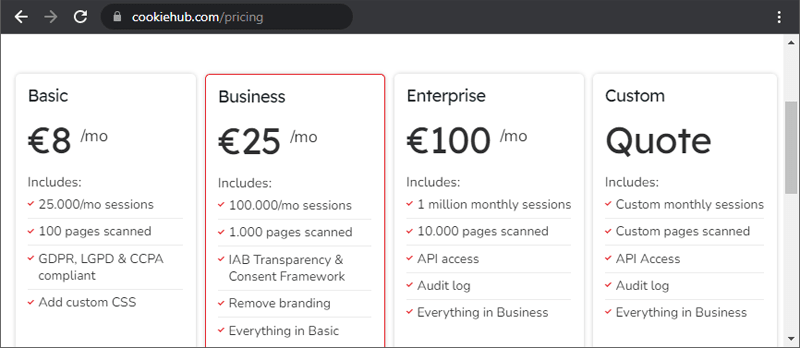
One session counts for each unique user each day they visit your site. Over-quota sessions cost depending on the plan: Basic/Business/Enterprise - €0.25/€0.10/€0.05 for 1'000 additional sessions.
Pages scan limit is the maximum number of pages the CookieHub scanner will check, the crawler will just stop once the limit is reached. It's worth saying here that usually, even on a large website with thousands of similar pages, most or all cookies are detected after scanning just a few dozen pages.
So, check your website stats and choose the most suitable plan:
On the registration page, enter your email as well as your website address and follow the instructions to create an account.
Once you're registered, navigate to Billing section and add a payment method by entering your credit card details and choosing 'Only link' option. It's not necessary to pay right now, as all paid plans have a 30-day trial period.
Meanwhile, your site is already being checked for cookies, and the results will soon appear on your dashboard.
Step #2. Categorise cookies used on your website
The CookieHub scanner already running in the background detects all cookies set by your site, and tries to group them into 4 known categories: Necessary, Preferences, Analytics, Marketing.
To check the scan results, go to My domains section. Here, in the 'Cookies' column, you can see the total number of detected cookies and those of them which need attention. Usually, the ones needing attention are marketing and analytics cookies that your website creates without prior consent obtaining, although it is most likely required. To sort them out, click on the '{X} need attention' link:

⠀
Then on the opened page look for cookies that are not set up correctly (marked with ❌):
⠀

If any of ❌-marked cookies is required for the website's proper functioning, click 'Edit' button and change their category to 'Necessary' or 'Preferences'.
The Necessary ones are those used for authentication, shopping cart, load balancing, etc. Preference cookies store data such as the user's preferred language, region, currency, color theme, other similar settings.
Both of mentioned cookie categories do not require the user's prior consent.
Analytic and Marketing cookies that have a red cross will be marked with a green checkmark once CookieHub is fully implemented on your site.
If you have 'Uncategorized' cookies in the list, try to define their type and move the ones to the most suitable category ('Edit' button → 'Category').
At the end click the green 'Save & Publish' button.
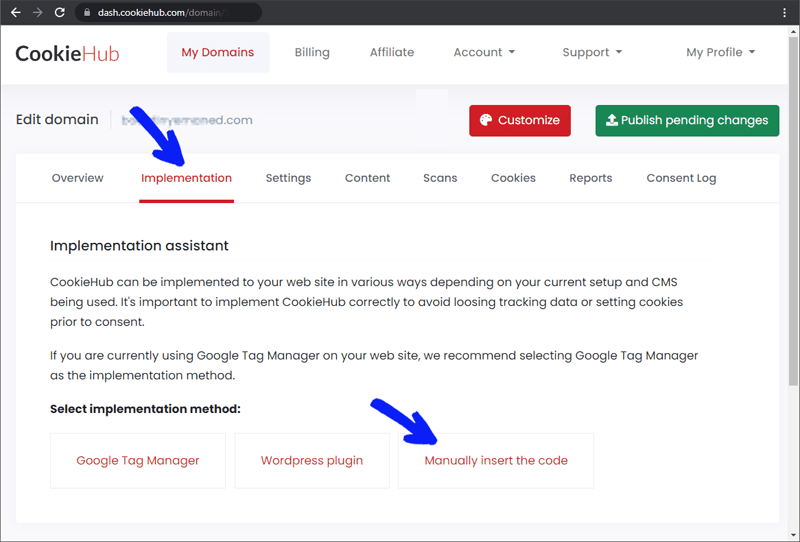
Step #3. Implementation
The last step we have to do is adding CookieHub code to the site. There are three ways: via Google Tag Manager (GTM), using a Wordpress plugin, or by manual implementation.
If you are using GTM or Wordpress, follow the instructions on the CookieHub website (see here and here).
As for our case, we will choose the most commonly used method — manual implementation. To do this, go to the 'Implementation' tab and click 'Manually insert the code':
On the next page, copy the shown script to the clipboard and paste it into the HTML of your site — in the <head> block or at the end of the <body>. After you do this, the cookie consent dialog will appear on the site, and users will be able to allow or disallow certain categories of cookies. To respect these choices, we need to find and slightly modify all the <script> and <iframe> tags on the site that initiate or create the cookies.
In the <script> tags related to cookies, do the following:
- add
data-consentattribute with a value corresponding to the category of cookies the script creates. The value should be one of these: 'necessary', 'preferences', 'analytics', 'marketing', 'uncategorized' - replace
srcattribute name withdata-src - replace
type="text/javascript"withtype="text/plain"(or addtype="text/plain"if the type was not defined)
For <iframe> tags, the same modifications except the last one (type-related) should be made.
As a result, your cookies-related tags should look like the examples below:
<script type="text/plain" data-consent="marketing"> ... </script>
<script type="text/plain" data-consent="analytics" data-src="https://www.googleoptimize.com/optimize.js?id=OPT-XXXXXXXX"></script>
<iframe data-consent="analytics" data-src="https://www.youtube.com/embed/XXXXXXXX" frameborder="0" width="560" height="315" allowfullscreen></iframe>
That's it, now go to the 'Scans' tab, request a re-scan of the site and wait for it to complete. The scan results will be sent to your email address and you will see whether all the cookies are set up correctly.
If everything is configured correctly, you should also no longer see 'need attention' message in the 'Cookies' column on your dashboard main page. If it's not the case, try to repeat the steps #2 and #3 again and make sure you haven't missed anything.
Useful tips:
- the cookie policy is generated automatically and is available under 'Cookie declaration' tab in the consent settings window; the document can also be published on any site page, see this guide for details
- for sites on popular CMS such as Wordpress, Joomla, Shopify, Wix and others, you can optionally see detailed implementation guides
- some websites use only just a few popular third-party services that set cookies (e.g. Google Analytics, Google Ads, Facebook Pixel), and as an alternative to manual implementation in such cases, the Automatic Cookie Blocking option can be used
- if you have any issues implementing the cookie banner, check the help section or contact customer support for assistance


Top comments (2)
Hello! Welcome to de DEV Community, seems as very useful information.
Thanks, it works!